How to convert images to PDF on iPhone or iPad
Turn one or more photos into a PDF, arrange the pages, choose A4, Letter, or original size, add margins and page numbers, then save or share it.
To convert images to a PDF on iPhone or iPad, select the photos, put them in page order, choose a page size such as A4, Letter, or the original image size, set margins and optional page numbers, then create and review the PDF before saving or sharing it. Convert Image to PDF - create keeps that workflow on the device.
Before you start
Collect the images you want in the document and check that each one is readable. Crop away accidental borders in Photos if necessary, rotate images that are sideways, and remove duplicates before import. Keeping the source images in one album can make a long selection easier.
Decide what the recipient expects. A teacher, office, or government portal may ask for one PDF rather than several image attachments. A printer may expect A4 or US Letter pages. A photo archive may be better with pages that follow the original image dimensions.
How to convert images to PDF on iPhone or iPad
- Open Convert Image to PDF - create.
- Choose images from your photo library. Select every photo that belongs in the document.
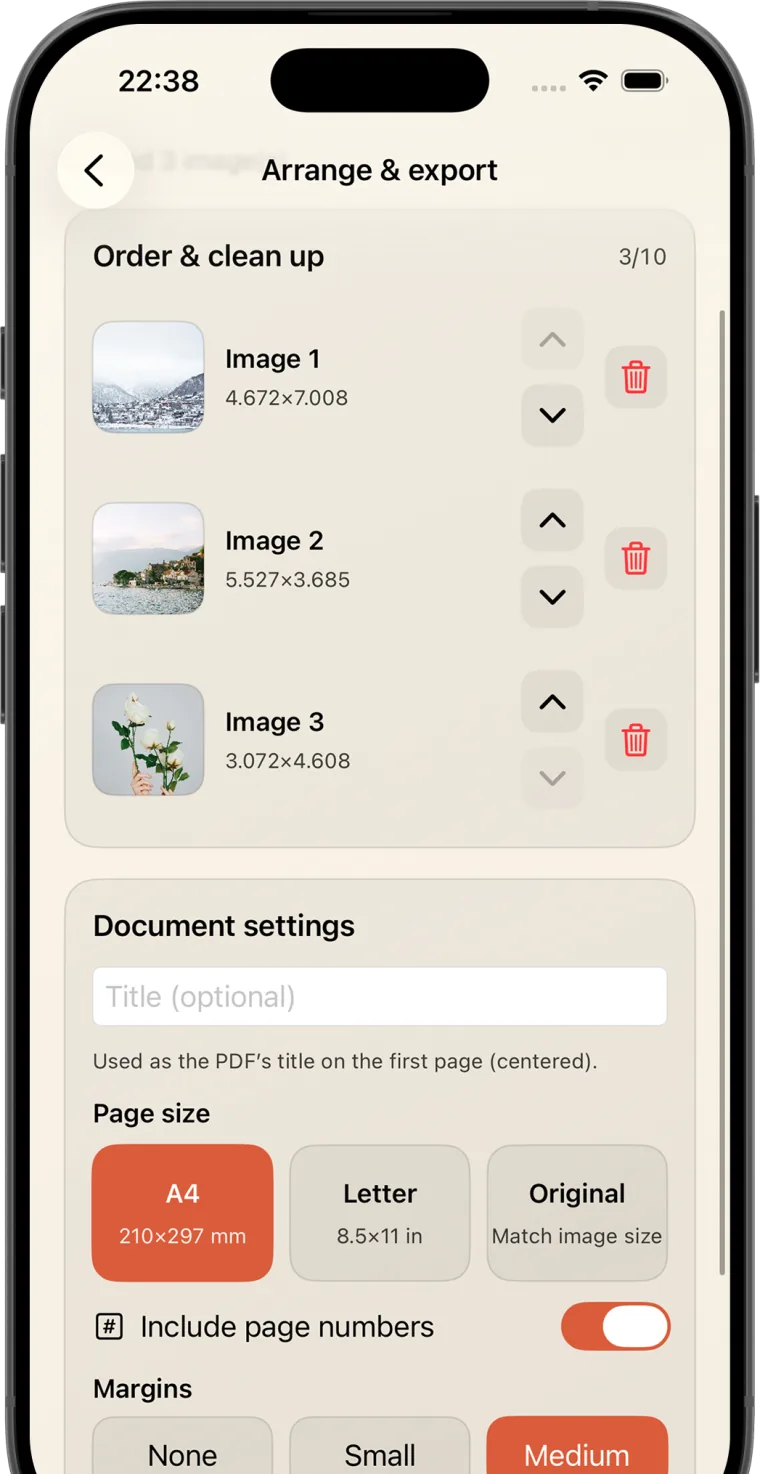
- Review the ordered list. Move images up or down until the first image is the first PDF page.
- Remove any duplicate, blurred, or unrelated image.
- Add an optional document title if you want it centered on the first page.
- Choose A4, Letter, or Original for the PDF page size.
- Select a margin and decide whether to include page numbers.
- Create the PDF, open the preview, and check the page order and readability.
- Use the share or save action to send the PDF to its destination or keep it in Files.
Choose A4, Letter, or Original page size
A4 is 210 × 297 mm and is a common paper size outside the United States and Canada. Choose it when a recipient or printer asks for A4, or when you want every page to have a consistent document shape.
US Letter is 8.5 × 11 inches. It is a practical choice for documents intended for many North American schools, offices, forms, and printers.
Original matches the page size to the image. It avoids forcing a portrait photograph and a landscape photograph into one fixed paper shape, but pages in the same PDF can have different proportions.
Choose margins and page numbers for the destination
A margin creates space around the image. It can keep content away from a printer's unprintable edge and give a document a more consistent appearance. A larger margin also makes the image smaller on the page, so check small writing in the preview.
Page numbers are useful for class notes, evidence, receipts, meeting records, or any document that another person may discuss page by page. Leave them off for image portfolios and visual documents where the number would distract from the content.
Check the PDF before sharing
- Open the PDF and move through every page.
- Confirm the page order starts and ends correctly.
- Zoom in on the smallest text to make sure it remains readable.
- Check that portrait and landscape images are oriented correctly.
- Confirm that margins do not hide important details.
- Use a clear filename before saving the final copy.
Can you convert an image with Apple's built-in apps?
Yes, depending on the iOS version and the task. Apple documents that Preview on iOS 26 can export an open image as a PDF. Apple's Photos guide also explains how to share and print photos. These built-in routes are useful for a quick single-image conversion.
A dedicated image to PDF app is more useful when you need to arrange several photos, apply one explicit paper size, choose margins, add page numbers, preview the result, and keep a history of conversions in one workflow.
Privacy when photos become documents
Receipts, IDs, school records, and personal notes may contain sensitive details. Convert Image to PDF - create says conversion happens on the device and does not require an account. Its current App Store privacy label says the developer does not collect data from the app.
Remember that the destination matters too. Once you share the finished PDF with email, cloud storage, a school portal, or another app, that service applies its own privacy and retention practices.
Quick answer
For a clean multi-page result, arrange the photos first, choose the paper size based on the recipient, add only the margin and page numbers you need, then inspect every page before sending. Convert Image to PDF - create provides these controls with local processing on iPhone and iPad.